Azure: The request was aborted: Could not create SSL/TLS secure channel.

Aer you running in to the following error when trying to login to Azure?

Add-AzureRmAccount : accessing_ws_metadata_exchange_failed: Accessing WS metadata exchange failed: The request was
aborted: Could not create SSL/TLS secure channel.
At line:5 char:1
+ Add-AzureRmAccount -Credential $AzureAutomationCredential
+ ~~~~~~~~~~~~~~~~~~~~~~~~~~~~~~~~~~~~~~~~~~~~~~~~~~~~~~~~~
+ CategoryInfo : CloseError: (:) [Add-AzureRmAccount], AadAuthenticationFailedException
+ FullyQualifiedErrorId : Microsoft.Azure.Commands.Profile.AddAzureRMAccountCommand

This may happen if your company is redirecting your login, and has disabled TLS 1.0/1.1 that is used by default by the Automation session.

You can add the following line to the top of your powershell code to get arround this issue:
[Net.ServicePointManager]::SecurityProtocol = [Net.ServicePointManager]::SecurityProtocol::TLS12

This issue is currently active with the following modules/tools:
– Azure Automation (10/8/2018)
– AzureRm Module version 6.9.0
– AZ Module version 0.2.2

Download from Azure blob using the Azure Rest-API

Today a colleague came to me with the question, if it is possible to download a file from Azure Storage from a Windows server.
Now this would normally be fairly simple, however:

1. We would not be allowed to use an external tool (like azcli / azcopy)
2. The server runs Windows PowerShell 4.0 (and an upgrade is not possible at this time).
3. AzureRm(.Storage) PowerShell module does not support PowerShell 4.0
4. We should be using a SAS-Token to download the files from the Azure Storage Account.

I figured that the only option we had left to approach was to use invoke-Webrequest against the Azure Rest-API.
Digging into the documentation on Microsoft Docs I found the following article: https://docs.microsoft.com/en-us/azure/storage/common/storage-dotnet-shared-access-signature-part-1

If you read closely into the documentation you can see that the SAS token aquired from the Storage Account can simply be added at the end of the requesting URI to authenticate.
Due to this nature, there is no need to add an additional header to the webrequest, making this faily simple to use.

The result is the following simple function we can now use to download files from blobs within azure from *any* windows server with access to Azure.

Function Get-AzureBlobFromAPI {
    param(
        [Parameter(Mandatory)]
        [string] $StorageAccountName,
        [Parameter(Mandatory)]
        [string] $Container,
        [Parameter(Mandatory)]
        [string] $Blob,
        [Parameter(Mandatory)]
        [string] $SASToken,
        [Parameter(Mandatory)]
        [string] $File
    )

    # documentation: https://docs.microsoft.com/en-us/azure/storage/common/storage-dotnet-shared-access-signature-part-1
    Invoke-WebRequest -Uri "https://$StorageAccountName.blob.core.windows.net/$Container/$($Blob)$($SASToken)" -OutFile $File
}

Get all the available API versions in Azure

Today a colleague came to me with an ARM template, asking me why certain elements did not seem to process properly when he was deploying this template to Azure.
We came to the conclusion that he was using an old apiVersion reference in his ARM template, that did not include this element yet.

While we mostly use Visual Studio to build ARM templates (and tend to be lazy) and use the ‘add a new resource’ button, this mostly never populates the actually latest avaialble Api version for the resource.

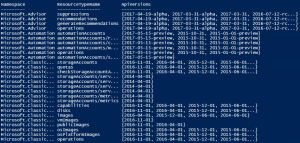
Using powershell to our advantage however, we can quickly retrieve all the latest available versions from Azure.

The “Get-AzureRmResourceProvider -ListAvailable” cmdlet will give you all the available AzureRm Resource Providers.
If you dig a bit deeper into the object, you will notice that the ResourceTypes will display the resource types, locations and API versions.

Lets grab all these details together and display them in a readable list.

$Namespaces = (Get-AzureRmResourceProvider -ListAvailable).ProviderNamespace
foreach ($Namespace in $Namespaces) {
(Get-AzureRmResourceProvider -ProviderNamespace $Namespace).ResourceTypes | select @{l='Namespace';e={$Namespace}},
                                                                            ResourceTypeName, 
                                                                            ApiVersions
}

Now we can get a full overview on AzureRM available API versions per resourcetype.


Tip: Would you only need to see the resources you are currently using? Try removing the -ListAvailable switch.

xAzureTempDrive DSC Module

Today I published my xAzureTempDrive DSC Module to the PowerShell Gallery.

Gallery source: https://www.powershellgallery.com/packages/xAzureTempDrive
Github source: https://github.com/DdenBraver/xAzureTempDrive

This module contains a resource that will change the default temporary disk driveletter from the D-Drive to whatever you would like it to be.

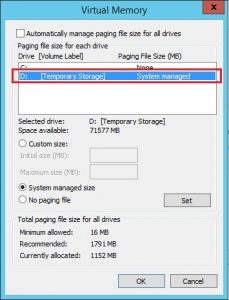
In the past I have been struggling with this, since the Temp disk is always attached to the D-Drive by default.
Most application teams or customers would however like to use the D-Drive for their own data, (or other usage) and rather have it assigned to a T-drive or maybe even a Z-drive.

To be able to change this however, you would first need to remove the page file from the volume, then reboot the server, then change the driveletter, and then -if- you would like to go trough the hassle you’d have to change the pagefile back to the temporary drive again.

Well that is great, however now when Azure has maintenance or when you deallocate (stop) the VirtualMachine and start it again…. Well yeah it automatically gets a new Temporary disk and voila its attached to the first available driveletter once again!

This DSC resource will help you with that part.

Since its the nature of DSC, it will poll continuously and check for you (by using the assigned pagefile) what driveletter the pagefile has been assigned to.
If this is anything other then what you have defined, it will remove the pagefile, reboot the server, change the temporary disk driveletter, and then attach the pagefile to it again for you.
This way the driveletter will -always- remain on the driveletter you want it to be!

I hope you will enjoy this simple resource as much as I do, since I love it to see all those temporary disks having the same driveletter across all the servers in my domain 🙂

~Danny

Disable proxy settings at system level

Today I was facing some issues with the proxy server at the company I was working for.
It seemed that a rule was applied that made all servers connect outbound trough a proxy, instead of only the desktops as provided.

In an attempt to quickly resolve this issue, I quickly searched the internet.
I found that its rather easy to find how to disable the proxy settings using GPO, or at a user level. However it was not that easy to find how to disable this at a system level.

It seems that there are 2 registry keys that need to be created (or modified) to do this.
These registry keys are located at HKLM:\SOFTWARE\Policies\Microsoft\Windows\CurrentVersion\Internet Settings

Step 1, disable the user based proxy settings:
In the HKLM:\SOFTWARE\Policies\Microsoft\Windows\CurrentVersion\Internet Settings there is a DWORD called ProxySettingsPerUser, if this is set to 0 it will be disabled and system wide settings are used. Put it back to 1 or remove this key entirely to enable user based proxy settings again.

Step 2, disable the automatic detect proxy settings checkbox.
In the HKLM:\SOFTWARE\Policies\Microsoft\Windows\CurrentVersion\Internet Settings there is a DWORD called EnableAutoProxyResultCache, set it to 0 and it will be disabled.

Here is a simple script you can use to inject these settings into the registry directly.

$regPath = "HKLM:\SOFTWARE\Policies\Microsoft\Windows\CurrentVersion\Internet Settings"
$null = New-ItemProperty -Path $regPath -Name 'ProxySettingsPerUser' -Value 0 -PropertyType DWORD -Force
$null = New-ItemProperty -Path $regPath -Name 'EnableAutoProxyResultCache' -Value 0 -PropertyType DWORD -Force

~Danny

Creating goals, mastering challenges, and realising dreams.

Somebody once told me, that to live your life to the fullest, you have to chase your dreams.
This is exactly what I have been working on throughout my entire carrier, although the biggest step in this might be today.

When I was only 3 years old, it was my eldest brother that introduced me with computers. To be exact it was the Commodore 64. I will never forget this moment, especially spending hours copying games from my receiver to my disks.
Ever since that moment, computers hypnotized me, I love them, and I made it my hobby to learn everything I wanted to know about them. My goal was to do ‘tricks’ with them, do the things you weren’t supposed to do. Or to just break the software and try to fix it again (hopefully learn something additional this way).

Years had passed when I became older, and my goals had changed. Somebody asked me what I would like to become when I got older. I could not put my finger on it what I exactly wanted to do, but it had to be something with computers, I wanted to make a living out of my hobby.
Eventually I switched my education to study ICT at the Nova Collega in Hoofddorp, and after this I eventually found my first job as helpdesk employee for SNT/Wanadoo.

Shortly after this I found my next goal, the old fashioned IT we’re been working on, that had to be an better way. My new goal was to automate every action I had to do at-least 3 times in a row manually. This did not make all managers happy at the time, since automating would cost precious time where they did not see direct result, so I made this my new hobby.
Finally years later after teaching myself, Delphi, Visual Basic and Java, a new language started becoming a big player on the market: PowerShell.
It was during this period I had to do a lot of daily manual actions for Exchange at a customer, and I quickly noticed that writing a few minor scripts made my day a hell of a lot easier.
After I showed this to management they asked me to do this more often, and usually for deployments, or virtual servers.

Eventually I got in touch with automating VMware, and later on Hyper-V. I changed my goals again. I wanted to do more with virtualization, and eventually more with cloud technologies.
Everybody talked about the ‘Cloud’ but what did that really mean?. I did not exactly know it yet at that time but I did know I wanted to lean a lot about it, and share it with the people around me.
I started combining my new passion with cloud technologies with the scripting knowledge I had been working on. I began to automate deployments, write additional code to manage Hyper-V environments in an easier way, and eventually wrote scripts to deploy ‘Roles’ to servers. Because be honest, how many people want an empty server? They want to have specific applications or functions, and perhaps the most important, they wanted every machine to be exactly the same after a deployment (outside of specifications).

Again I learned quite a lot, and technologies changed big time these last few years.
This made me again review my goals. I wanted to share all this knowledge with more people. I loved talking about the new stuff I had been working on, how you could use it in your daily job, and how to simplify managing your environments.
I started blogging, giving presentations at customers, and at some events. But I also started sharing code back to the community on Git-Hub. This is where I had landed un until now, and what I am still doing on a day to day basis.

However, about a year ago a new goal started growing in me. I loved working with automation, new Microsoft cloud solutions, and sharing stuff. But I wanted to do more.
Everywhere I looked around me, when big players and sourcing companies were recruiting and delivering generic systems engineers, or generic automation engineers, nobody placed themselves on the market as ‘the experts’ for PowerShell or Cloud Automation. It became my dream to see if I could fill this gap.

At about this same time, I was placed at a customer together with my good friend and colleague Jeff Wouters. We roughly had about the same idea’s, and eventually we sat together to discuss our ideals and goals, and see if we could realise them: create a company that is fully specialised in Cloud & PowerShell automation. This is where the new Methos was born.

Since Jeff and I are both very community related, it probably won’t surprise you that we are trying to make a difference when it comes to communication between colleagues in the field.
You hire an expert? You don’t only receive the expertise of this individual, but the expertise of the whole Methos group. We believe that nobody knows everything, and you know more with many.
If there is enough contact between the colleagues, people can learn and grow with each other’s expertise’s. Next to this we will encourage people to go to community events around their own expertise’s, and will invite customers to internal master classes on different topics.

The next few years, we will be focussing us on our new dream, and to build on Methos. We will do more than our best to make this a successfully company, and The cloud and datacentre experts in the Netherlands.

WAP Websites UR9 and External Storage issue (FTP: “550 Command not allowed”)

The last few weeks we had upgraded the test environment of Windows Azure Pack Websites at a customer to Update Rollup 9, and Azure Pack to Update Rollup 10.
Since this update we were seeing strange behavior on the environment when we were uploading data using FTP.

All the subscriptions and websites that were already running before the upgrade seemed to be running fine, however an issue started after creating new websites.
Whenever we would connect using FTP, we could list all data but for some reason we could not upload anything.

The exact error we were receiving was:

“550 Command not allowed”

However when we were uploading using GIT or the publish template, everything was working fine.

After some digging and sending detailed information over to Microsoft, we received the answer from Joaquin Vano.
There seems to be a bug in Azure Pack Websites where Quota’s are being enforced using the wrong method for external fileservers.
This check would then fail and kill any upload to the share with an access denied message.

You can resolve this issue with the following work-around:
Go to “C:\Windows\System32\inetsrv\config\applicationHost.config” on the Publisher servers.

Edit the following key value:

<add key="storageQuotaEnabled" value="True" />

and change it to False:

<add key="storageQuotaEnabled" value="False" />

We have been made aware that this issue will be resolved in the next update for Azure Pack Websites.

Source

Create custom Webworkers in Windows Azure Pack Websites

Today a customer came to me with the question if it would be possible to create your own Webworkers in Windows Azure Pack websites.
The reason for doing this is because they want customers within 1 subscription to be able to have 1 website in a “small” scale, and for example another in a “medium” scale.

With the default instances available this is not possible.
When you install Windows Azure Pack websites you get 2 compute modes: Shared, and Dedicated. You get 3 SKU modes: Free, Shared and Standard.
And these SKU modes have one or multiple worker Tiers.

Free: Shared
Shared: Shared
Standard: Small, Medium and Large

So to be able to reach this goal we need to create dedicated SKU’s for new the existing tiers, or new tiers in new dedicated SKU’s.
After starting to look for some documentation I found there was not much available describing this, however when I started looking for commandlets I found the following:

get-command *sku* -Module websitesdev

CommandType Name Version Source
----------- ---- ------- ------
Cmdlet Get-WebSitesSku 1.0 Websitesdev
Cmdlet New-WebSitesSku 1.0 Websitesdev
Cmdlet Remove-WebSitesSku 1.0 Websitesdev
Cmdlet Set-WebSitesSku 1.0 Websitesdev
get-command *tier* -Module websitesdev

CommandType     Name                                               Version    Source
-----------     ----                                               -------    ------
Cmdlet          Get-WebSitesWorkerTier                             1.0        Websitesdev
Cmdlet          New-WebSitesWorkerTier                             1.0        Websitesdev
Cmdlet          Remove-WebSitesWorkerTier                          1.0        Websitesdev
Cmdlet          Set-WebSitesWorkerTier                             1.0        Websitesdev

After this, the next few steps were easy to create a new Workertier, and a new SKU.

New-WebSitesWorkerTier -Name "Custom-Small" -ComputeMode "Dedicated" -NumberOfCores '1' -description "Custom Small Tier" -MemorySize '2048'
New-WebSitesSku -SkuName 'Custom' -ComputeMode 'Dedicated' -WorkerTiers 'Custom-Small'

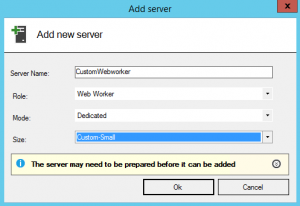
CustomWebworker

Now I was able to add this new worker into my websites cloud, and use it in my Windows Azure Pack portal!

New SQLServer DSC Resource cSQLServer

Today we have released a new SQL Server DSC Resource that has been created by merging the already existing xSQLServer and xSqlPs resources and adding new functionality like:

– SQL Always-On (with domain credentials)
– SQL Always-On between 2 Clusters
– SQL File streaming
– SQL Always-On with Listener

For more information please check the source at:

cSQLServer:       https://github.com/Solvinity/cSQLServer
cFailoverCluster: https://github.com/Solvinity/cFailoverCluster
Demo Video:       https://youtu.be/l8KwLUtXNB8

A more in depth article will be published early January!

-Danny

Merry X-mas and a Happy New Year!

Its that time of year already, where the holiday celebrations start and everybody sends each other the bests of wishes in cards. I usually do this the traditional way too, but I wanted to do it slightly different this year 😉

https://github.com/DdenBraver/Xmas-Tree

Have a good year!

-Danny